
This article walks through setting up a local development environment for the Bodymovin After Effects extension, including enabling debug mode for unsigned CEP extensions, attaching the VS Code ExtendScript Debugger to step through JSX code, and finally signing and packaging the extension into a ZXP file with ZXPSignCmd.
Setting Up the Adobe CEP Extension Development Environment
Enabling Debug Mode for Unsigned Extensions
macOS
Enable debug mode with defaults write com.adobe.CSXS.12 PlayerDebugMode 1. This writes to the plist file located at /Users/<username>/Library/Preferences/com.adobe.CSXS.12.plist.
Run ps aux | grep cfprefsd to find the PID of the cfprefsd process, then kill it manually. It will restart automatically, and the plist change from the previous step will take effect immediately.
Windows
Edit the registry under HKEY_CURRENT_USER/Software/Adobe/CSXS.12: add a new string value named PlayerDebugMode and set it to 1.
Debugging the Bodymovin Extension
After Effects Setup
In After Effects Settings, Scripting & Expressions tab, turn on all of the options in Application Scripting section.

Installing Dependencies and Configuring Local Paths
Clone Bodymovin to your local drive. Go to its root directory and run npm install. Then go into the bundle/server directory, remove the imagemin-jpegoptim and imagemin-jpegtran dependencies from its package.json, and run npm install there as well.
Back in the bodymovin root directory, change extensionDestination in gulpfile.js to the directory where the CEP extension should be installed. On macOS, it can be either of these two paths:
/Library/Application Support/Adobe/CEP/extensions/bodymovin
~/Library/Application Support/Adobe/CEP/extensions/bodymovin
On Windows, it can be either of these two paths:
C:\Program Files\Common Files\Adobe\CEP\extensions\bodymovin
C:\Users\<USERNAME>\AppData\Roaming\Adobe\CEP\extensions\bodymovin
After saving the path change, run npm run start-dev.
Once the app starts, it copies the bodymovin extension to the directory you configured. Restart After Effects at this point, and it should load the debug version of the plugin.
On macOS, due to write permission issues, using ~/Library/Application Support/Adobe/CEP/extensions is usually more convenient. However, CEP extensions under /Library/ take priority when loading, so for local development and debugging it is recommended to remove any installed bodymovin extension and keep only the debug version.
VS Code Extension
It is recommended that you use VS Code to debug, since Adobe has an official ExtendScript Debugger extension in VS Code.
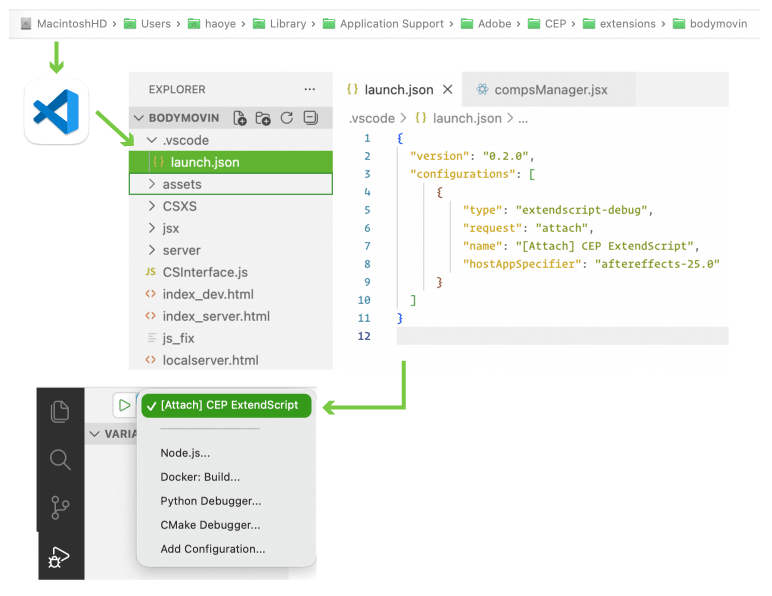
After starting the app with npm run start-dev in the previous step, gulp copies the files to the extension path configured earlier. Open that directory in VS Code, create a .vscode/launch.json configuration, and add the following:
{
  "version": "0.2.0",
  "configurations": [
      {
          "type": "extendscript-debug",
          "request": "attach",
          "name": "[Attach] CEP ExtendScript",
          "hostAppSpecifier": "aftereffects-25.0"
      }
  ]
}
Set hostAppSpecifier according to your actual setup (you need to change the version number based on your After Effects version). Then go to the Debug tab, select “[Attach] CEP ExtendScript”, and click the Start Debugging button to attach the JSX (ExtendScript) code to AE.
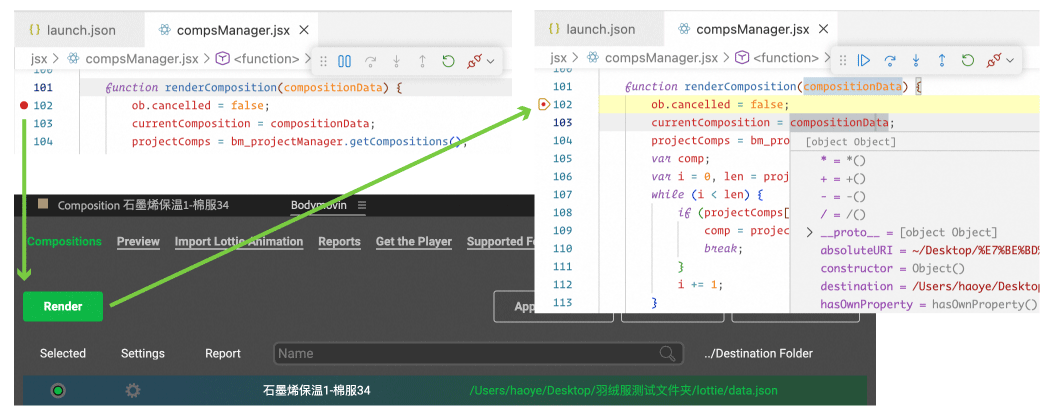
Now you can start debugging the JSX part of the code. Take exporting a comp as JSON as an example. Open jsx/compsManager.jsx in VS Code, locate the renderComposition method, and set a breakpoint. Then open the Bodymovin plugin in AE and try exporting a composition. After clicking the Render button, AE sends a message to VS Code, and you can start stepping through the code at the breakpoint.
Publishing the Bodymovin Extension
ZXPSignCMD
Download the ZXPSignCMD command-line tool.
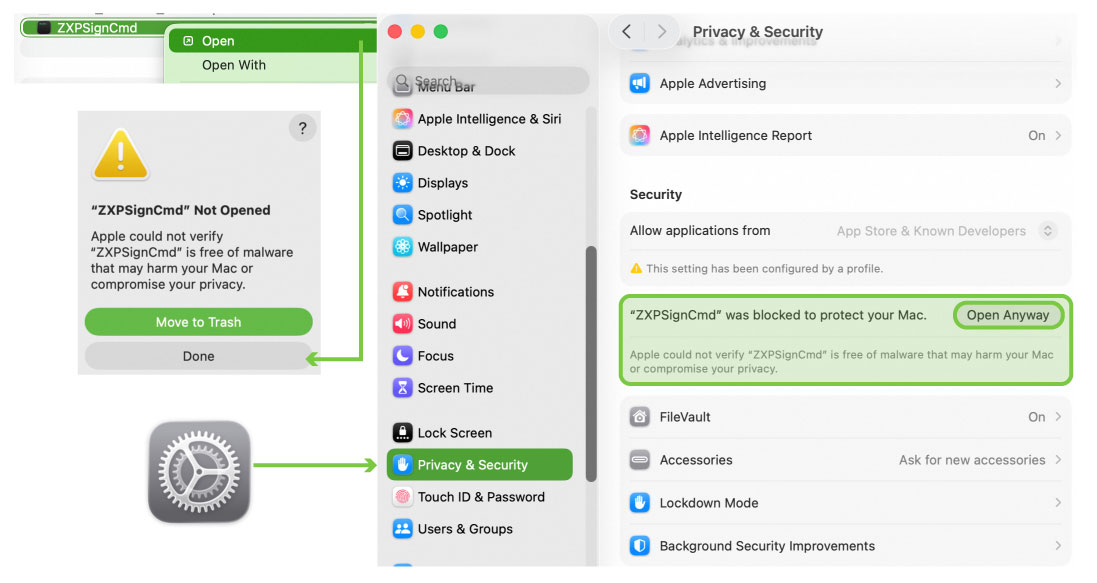
On macOS, update its permissions with chmod 777 /your_download_path/ZXPSignCmd and open it once from the right-click menu. The system will warn you that “Apple could not verify “ZXPSignCmd”” and suggest moving it to the trash. Click Done, then go to System Settings, find Privacy & Security, scroll down near the bottom, and click Open Anyway.
Certificates
Use the ZXPSignCmd tool to generate a self-signed certificate.
ZXPSignCmd -selfSignedCert <countryCode> <stateOrProvince> <organization> <commonName> <password> <outputPath.p12> [options]
See its --help for the available options.
Packaging
In the bodymovin extension development directory, run npm run build to compile the latest code into the build directory.
Use the following command to package it into a zxp file.
ZXPSignCmd -sign <inputDir> <outputZxp> <p12> <p12Password> -tsa <timestampURL>
Where:
| Parameter | Description |
|---|---|
| inputDir | Path to the build directory produced by npm run build |
| outputZxp | Path of the .zxp extension file to output |
| p12 | Path to the p12 certificate |
| p12Password | The password entered when exporting or generating the p12 certificate |
| timestampURL | Always provide this when packaging; it guarantees the validity of the extension at packaging time. You can use Apple’s TSA: http://timestamp.apple.com/ts01. For more free TSA services, see this gist. |
Once packaging is done, you can install it with ZXPInstaller.